Introduction
In pentests, connecting devices to your own network can be very useful. This enables you to exfiltrate data, download tools, analyze the network traffic and even use a transparent HTTP proxy to intercept and manipulate traffic between the devices and servers. This approach helps finding potential security weaknesses in applications and network communications.
In order to make this process easier, I created a script 802.11evil that
starts a new Wi-Fi network which can then be used to analyze the network traffic
of the connected clients and also perform some VPN bypasses.
Usage
The script can be found on GitHub 1: https://github.com/emanuelduss/Scripts/blob/master/802.11evil.
$ ./802.11evil -h
Usage: 802.11evil [OPTION ...]

Program:
  Create evil WiFi access point / router.

Options:
  -l    LAN interface                     (default: eth0)
  -a    Access Point interface            (default: wlan0)

  -d    Disable WiFi (routing only)       (default: off)
  -4    IPv4 only mode                    (default: off)

  -i    Access Point IP address           (default: 192.168.42.1)
  -s    Access Point SSID                 (default: 802.11evil)
  -p    Access Point password             (default: password)

  -r    Redirect on/off                   (default: off)
  -f    Redirect ports from               (default: 80,443)
  -t    Redirect ports to                 (default: 8080)

  -o    DHCP Option 121 for Static Route  (default: off)
        Example: 0.0.0.0/1,128.0.0.0/1

Author: Emanuel Duss (https://emanuelduss.ch)
Before the script can be started, the infrastructure has to be setup correctly. One network interface of your notebook has to be connected to an upstream network (e.g. a network with Internet connection) and the other network interface should be an unused Wi-Fi interface that will be used to serve the new Wi-Fi network.
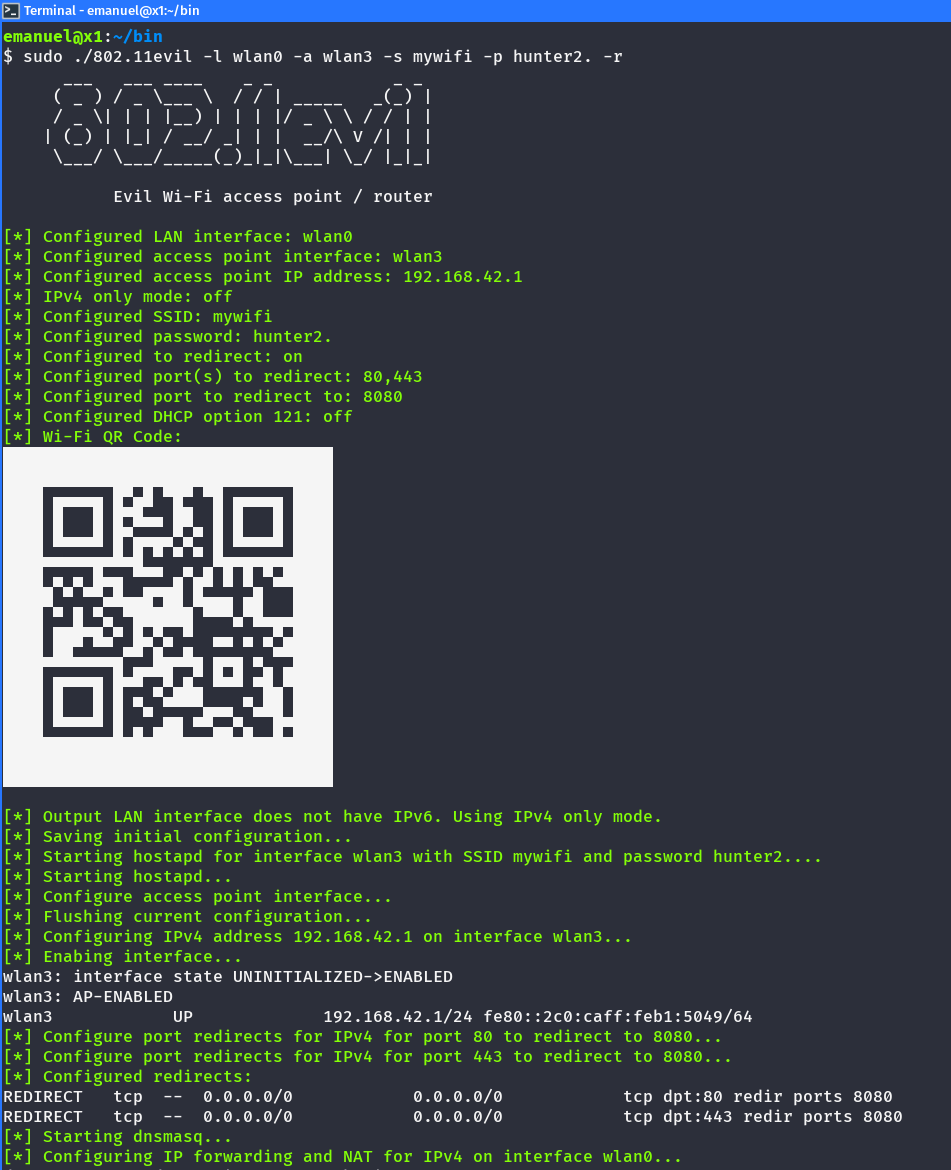
Then you can start the Wi-Fi. Example command:
sudo ./802.11evil -l eth1 -a wlan0 -s mywifi -p hunter2. -r -f 80,443,8443
Explanation:
- The command must be run as root, because network configuration is changed and services are started on privileged ports.
- The system is connected to an upstream network with Internet access on the interface
eth1. - The unused Wi-Fi interface
wlan0will be used to create the new Wi-Fi network. - This command creates a new Wi-Fi network with the name
testwifiand the passwordhunter2. - All all traffic from the connected clients to port
80,443and8443is redirected to port8080on the testing system.- On this port, a transparent proxy is running (like Burp Suite 2 or mitmproxy 3) which can be used to intercept the network traffic. For this, the proxy CA has to be installed on the clients (or the applications to be tested must be hooked in order to bypass TLS certificate verification).
- Alternatively, a tool like certmitm 4 could be used to test if clients correctly verify certificates at all.
The script will now automatically configure the network interfaces using the
ip command, enable IP forwarding using sysctl and configures NAT using
iptables 5 so that the system acts as a router and that the
clients can access the upstream network. To redirect the ports to a proxy,
iptables is used as well. The proxy has to act in transparent mode
6, since the clients do not have the proxy explicitly
configured. To assign IP addresses to the clients via DHCP and to resolve
hostnames via DNS, dnsmasq 7 is used. The Wi-Fi hotspot is created
using hostapd 8. All configuration is done within the script and no
external configuration file is required. The same is done for IPv6 as well if
your configured system has a global IPv6 address configured.
When the job is done, the script can be terminated using ^C (Ctrl-C). This
will stop all started services and restore the previous configurations of IP
addresses, the iptables firewall and IP forwarding.
Changelog
2025-10-21: Wi-Fi QR Code
If you have qrencode installed on your system, the output will now contain a
Wi-Fi QR code that can be scanned to quickly connect to the Wi-Fi:
This can e.g. be used during courses or presentations where several people have to join your Wi-Fi on their smartphone.
2025-10-19: IPv6 Support
If a VPN client is misconfigured, IPv6 traffic may bypass the VPN (typically because the VPN doesn’t handle IPv6) and is not blocked. As a result, clients can still reach link‑local addresses on the local network and may also communicate directly with Internet hosts over IPv6 when connected to an IPv6‑capable network. This can be abused in pentests for data exfiltration, test for VPN leaks, or download malware outside the VPN’s proxy/filtering, which would otherwise be blocked.
In 802.11evil, IPv6 support is enabled by default (but can be disabled by
using the -4 option). It detects if you have a global IPv6 address configured
and performs the configuration to also provide Internet access via IPv6 to its
clients.
The system assigns itself the IPv6 address fd42::1/64 on the Wi-Fi interface
and uses dnsmasq to announce the necessary network configuration to clients. As
with IPv4, the appropriate NAT rules and port redirects are also set up
automatically.
The following Router Advertisement shows the announced prefix and nameserver:
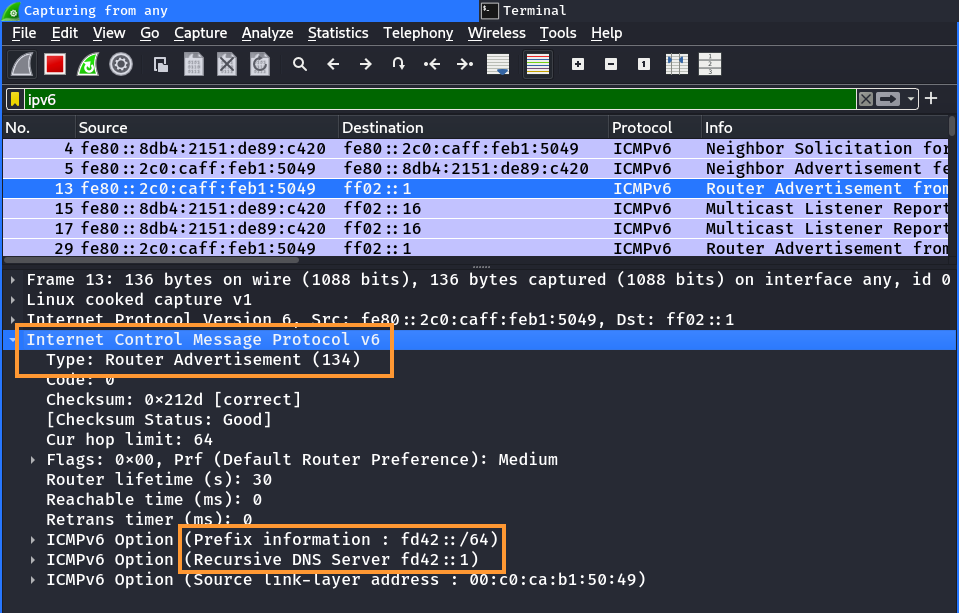
The clients will therefore have an IPv6 address from this prefix configured, a default route set and the nameserver configured accordingly. If everything is correctly setup, the clients can access external systems via IPv6.
2025-10-19: DHCP Static Routes (DHCP Option 121)
VPN clients typically install a default route that sends all traffic through the tunnel. If a client isn’t properly hardened, a malicious DHCP server can deliver more specific routes via DHCP options that override the default route and cause the client to send selected traffic outside the VPN. Attackers can exploit this to leak VPN client traffic or bypass network controls, enabling data exfiltration or downloading malware without going through the VPN network. This technique has been known for years and is documented in multiple places 9 10 11. It’s also sometimes referred to as DHCP 121 Route Injection or “TunnelVision” 12.
The -o option can be used to set such static routes via the DHCP option 121.
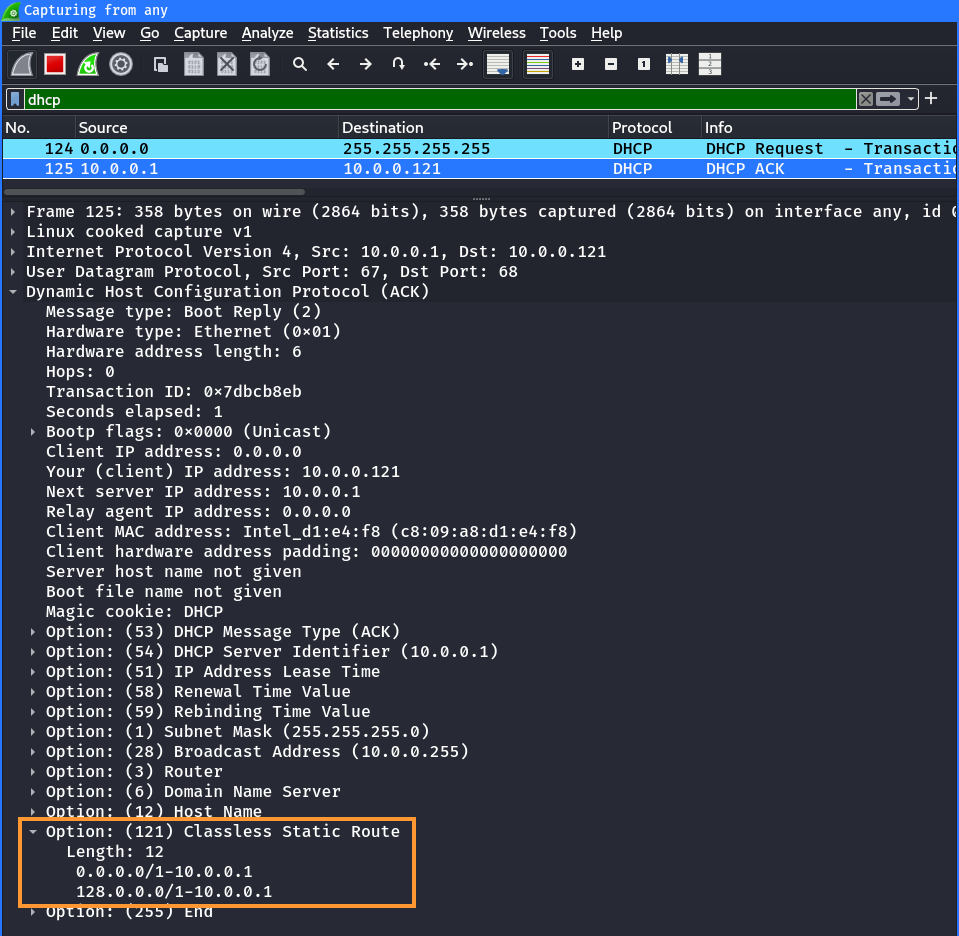
In the following example, the networks 0.0.0.0/1 and 128.0.0.0/1 are
configured. Both routes are more specific than the default route 0.0.0.0/0,
but they still cover the entire IPv4 address space (split into two subnets). If
the routes are accepted, they could let the client send all IPv4 traffic to the
802.11evil host instead of sending it through the VPN:
sudo ./802.11evil -l eth0 -a wlan0 -i 10.0.0.1 -r -f 443 -t 8000 -o 0.0.0.0/1,128.0.0.0/1
The DHCP static routes (option 121) containing the two subnets can be seen in
the DHCP ACK message. It automatically uses the access point IP address (in this
case 10.0.0.1) as the router:
This is accordingly reflected in the routing table of the client:
$ ip route
0.0.0.0/1 via 10.0.0.1 dev wlp0s20f3 proto dhcp src 10.0.0.121 metric 600
default via 10.0.0.1 dev wlp0s20f3 proto dhcp src 10.0.0.121 metric 600
10.0.0.0/24 dev wlp0s20f3 proto kernel scope link src 10.0.0.121 metric 600
128.0.0.0/1 via 10.0.0.1 dev wlp0s20f3 proto dhcp src 10.0.0.121 metric 600
2025-02-18: Disable Wi-Fi (Routing-Only Mode)
You can now disable the Wi-Fi functionality if you only want a simple router
with no wireless access point. Use the -d option to turn off Wi-Fi, then
connect your host(s) via Ethernet. Specify the interface where the client is
connected with -a and the uplink (Internet) interface with -i:
sudo ./802.11evil -l wlan0 -a eth0
802.11evil still runs DHCP, DNS and performs NAT but does not start a wireless
access point, even though the tool is still called 802.11evil 🤷.
-
GitHub, emanuelduss/Scripts,
802.11evilscript: https://github.com/emanuelduss/Scripts/blob/master/802.11evil Pasted image 20251026135116 The usage of the script is explained in the help: ↩︎ -
PortSwigger, BurpSuite, TLS Intercepting Proxy:: https://portswigger.net/burp ↩︎
-
mitmproxy, interactive HTTPS proxy: https://www.mitmproxy.org/ ↩︎
-
Certmitm, tool for testing for certificate validation vulnerabilities: https://github.com/aapooksman/certmitm ↩︎
-
NAT using iptables: https://netfilter.org/documentation/HOWTO/packet-filtering-HOWTO-9.html ↩︎
-
Burp Transparent Proxy: https://portswigger.net/burp/documentation/desktop/tools/proxy/invisible ↩︎
-
Dnsmasq, DNS/DHCP/RA/PXE Server: https://thekelleys.org.uk/dnsmasq/doc.html ↩︎
-
Hostapd, user space daemon for access points: https://w1.fi/ ↩︎
-
Hardening OpenVPN for DEF CON, 2015: https://www.agwa.name/blog/post/hardening_openvpn_for_def_con ↩︎
-
Poisontap, Exploits locked/password protected computers over USB, 2016: https://github.com/samyk/poisontap, https://samy.pl/poisontap/ ↩︎
-
A rogue DHCP server within your network can and will hijack your VPN traffic, LowEndTalk, 2023: https://lowendtalk.com/discussion/188857/a-rogue-dhcp-server-within-your-network-can-and-will-hijack-your-vpn-traffic ↩︎
-
TunnelVision (CVE-2024-3661): How Attackers Can Decloak Routing-Based VPNs For a Total VPN Leak, 2024: https://www.leviathansecurity.com/blog/tunnelvision ↩︎