Introduction
WireGuard is a relatively new open-source software for creating VPN tunnels on the IP layer using state of the art cryptography. I attended a self-organized session by the creator and developer Jason Donenfeld at the 34c3 who explained how WireGuard works and how it can be used. I was quite impressed by it’s simplicity and gave it a try. It worked more or less out of the box. Now I created a more advanced setup for accessing my home network.
In this blog post, I will describe how you can use it to remotely access your home or corporate network from any external network as a so-called road warrior.
WireGuard VPN Software
Here is a good talk from the WireGuard developer Jason Donenfeld explaining what WireGuard can do and how it works: https://www.youtube.com/watch?v=eYztYCbV_8U&t=16s
Some key features from this talk:
- WireGuard is a VPN solution (alternative/replacement for e.g. OpenVPN or IPsec).
- The WireGuard setup and configuration is kept very simple.
- It implements a layer 3 tunneling protocol for IPv4 and IPv6.
- It’s written in ~ 4k single lines of codes.
- The encapsulated IP packets are inside UDP packets.
- It uses state-of-the-art cryptography (only strong algorithms like Curve25519, ChaCha20, Poly1305 or BLAKE2 are supported and no other ciphers can be configured).
- WireGuard runs in the Linux kernel (but there are also userspace implementations).
- It can be managed using normal Linux networking tools like ip, iptables, …
- Authentication is done using private/public keys, similar to SSH keys.
- Clients can perform roaming, like in mosh ( https://mosh.org/).
- WireGuard does not respond to unauthenticated packages, so it is not possible to know if a server is running WireGuard if the sender is not authorized.
- It provides perfect forward secrecy.
- It does not disclose any identity because the public keys are never transmitted in cleartext over the internet.
- The key exchange (ECDH) takes only 1 round trip time.
- WireGuard is fast because it runs in the kernel space and because the used cryptographic algorithms are also very fast.
More infos, a whitepaper, setup instructions or demos can be found on the project website: https://www.wireguard.com/.
At some point, WireGuard will be integrated directly into the Linux kernel. Linus Torvalds said “it’s a work of art” and hopes it will be merged soon into the kernel: https://lists.openwall.net/netdev/2018/08/02/124.
Road Warrior Scenario
A road warrior is a person that uses a mobile client (e.g. notebook or mobile phone) to connect to their corporate or home network.
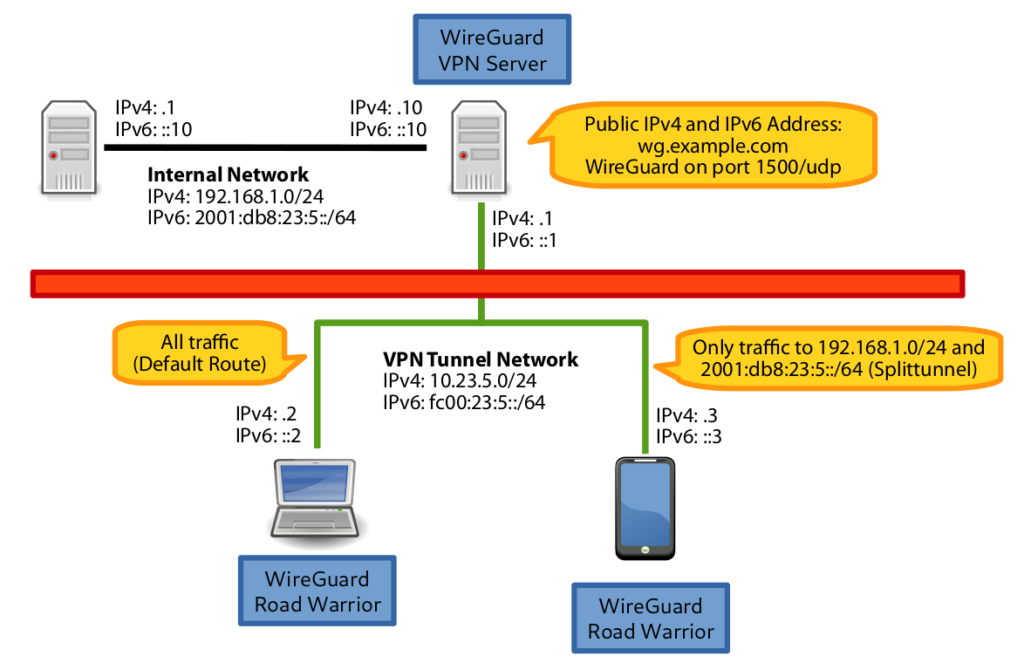
Features of this setup:
- The internal IPv4 and IPv6 intrastructure can be accessed from everywhere via IPv4 and IPv6.
- The WireGuard VPN client can be installed and used on Linux and mobile phones like Android.
- Either all traffic (default route) or only the traffic desired for the internal network can be routed through the VPN (split tunneling). This can be configured on the client.
- If a road warrior does not have an IPv6 connection, this can be provided through the VPN tunnel.
- The VPN server can also be behind a NAT router, because WireGuard works over UDP.
Note: If the road warrior establishes a VPN connection with the mobile phone and uses the mobile phone as a WiFi hotspot for another device (like a notebook), the traffic from the WiFi hotspot is not routed through the VPN. I’m not sure why this is the case but this is maybe a limitation of the OS on the mobile phone.
WireGuard Software Installation
Install WireGuard according to the installation instructions ( https://www.wireguard.com/install/).
Debian
Adding the WireGuard repo and install the wireguard package:
sudo apt update
sudo apt install wireguard
Arch Linux
Install on Arch Linux:
sudo pacman -S wireguard-tools
Android
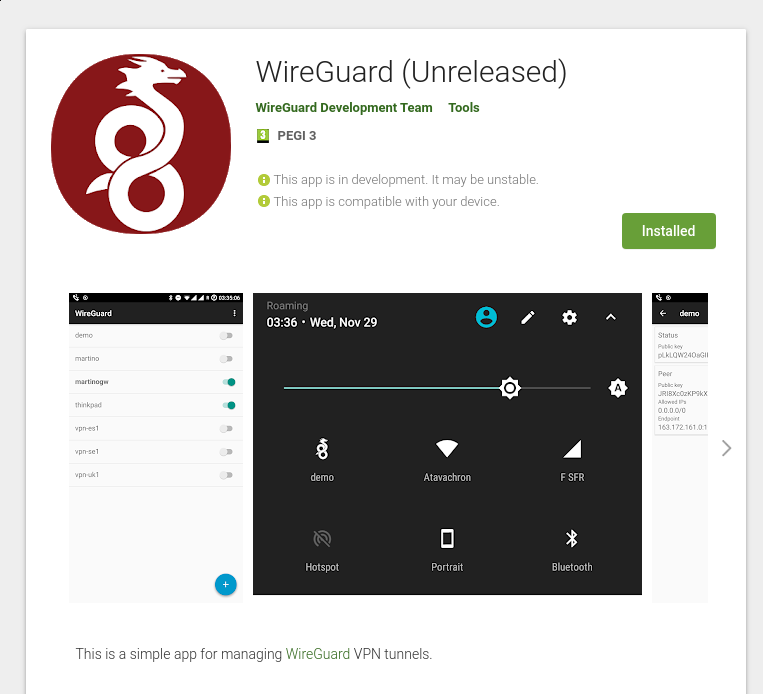
Install the WireGuard app from the play store: https://play.google.com/store/apps/details?id=com.wireguard.android&hl=en. This application implements WireGuard in the userspace. Therefore, the phone does not have to be rooted in order to use WireGuard.
Installation Test
You can test if the kernel module wireguard is loaded:
$ lsmod | grep -i wireguard
wireguard             147456  0
ip6_udp_tunnel         16384  1 wireguard
udp_tunnel             16384  1 wireguard
ipv6                  434176  33 nf_conntrack_ipv6,nf_nat_masquerade_ipv6,nf_defrag_ipv6,wireguard,nf_nat_ipv6
Server Key Generation
To ensure that all the files have the correct permissions (only readable and
writeable by the file owner, which in this case is the user root), the
umask has to be set to 077:
umask 077
The configuration is performed in the /etc/wireguard directory. Generate a private and public key for the server:
cd /etc/wireguard
wg genkey | tee server-private.key | wg pubkey > server-public.key
ls -l server-private.key server-public.key
Example server keys:
# cat server-private.key server-public.key
mNt0Gx2Af/OCkT9FchX3nybsaXUAerglnuMnSud4z1k=
3oPm1WH3RXv+8zCEQ7onRAYJWAvuHKo/1OfIiTE5LDc=
Client Key Generation
Generate a private and public key for every client.
In addition, generate a symmetric PSK which adds an additional layer of symmetric-key cryptography to protect against post-quantum cryptography attacks.
Note: These keys can also completely be generated on the client.
Notebook:
cd /etc/wireguard
wg genkey | tee notebook-private.key | wg pubkey > notebook-public.key
wg genpsk > notebook-psk.key
ls -l notebook-*
The same for the mobile phone:
wg genkey | tee mobile-private.key | wg pubkey > mobile-public.key
wg genpsk > mobile-psk.key
ls -l mobile*
Example keys:
# cat notebook-private.key notebook-public.key notebook-psk.key
OPTN5qb4FFulEBFLlrmC1sFTawT6AmdhsAbigpCMemw=
UGyBshzPfAH0U4QAgGJHe07LfUz4RcHA9PhUlUC4cCA=
FXaq2adlB1xj21RKXbzrI4Bkycqkn5zHWMqwFBzBHqQ=
Server Configuration
Private IPv6 Networks (Update from 2025-12-17)
The IPv6 pendant of private IPv4 addresses (RFC1918) for local networking are
the Unique Local Addresses (ULA) , which are defined in RFC 4193
(https://datatracker.ietf.org/doc/html/rfc4193). The ULA networks always are
located in the block fd00::/8 and have a randomly generated 48-bit IPv6
prefix.
An example prefix is fde5:e1b7:5bf0::/48 where the first subnet is
fde5:e1b7:5bf0::/64 and the last fde5:e1b7:5bf0:ffff::/64.
You can use https://unique-local-ipv6.com/ to generate your own random Unique
Local IPv6 address range. For simplicity, I’ll use fd00:23:5 in the examples
below.
WireGuard
Create a new configuration file for the server in /etc/wireguard/wg0.conf. The filename specifies the name of the VPN network interface. In this case, the new network interface will be named wg0.
# cd /etc/wireguard
# ls -l wg0.conf
-rw------- 1 root root 713 Sep 23 17:33 wg0.conf
# cat wg0.conf
[Interface]
Address = 10.23.5.1/24, fd00:23:5::1/64
ListenPort = 1500
PrivateKey = mNt0Gx2Af/OCkT9FchX3nybsaXUAerglnuMnSud4z1k=
PreUp = iptables -t nat -A POSTROUTING -s 10.23.5.0/24  -o enxb827eb7dc89a -j MASQUERADE; ip6tables -t nat -A POSTROUTING -s fd00:23:5::/64 -o enxb827eb7dc89a -j MASQUERADE
PostDown = iptables -t nat -D POSTROUTING -s 10.23.5.0/24  -o enxb827eb7dc89a -j MASQUERADE; ip6tables -t nat -D POSTROUTING -s fd00:23:5::/64 -o enxb827eb7dc89a -j MASQUERADE

# Notebook
[Peer]
PublicKey = UGyBshzPfAH0U4QAgGJHe07LfUz4RcHA9PhUlUC4cCA=
AllowedIPs = 10.23.5.2/32, fd00:23:5::2/128

# Mobile
[Peer]
PublicKey = 1xy8XRtUQT/9AwYWlEXsWCezNjfiFjXaBy40UUtAWBo=
AllowedIPs = 10.23.5.3/32, fd00:23:5::3/128
Configuration explanation Interface section:
Address: The server gets the IPv4 address10.23.5.1/24and IPv6 addressfd00:23:5::1/64assigned.ListenPort: The server will listen for UDP packets on the port1500.PrivateKey: This is the private key of the server generated earlier.PreUp: Aniptables/ip6tablesrule in thenatchain is added before the interface is created for performing NAT between the VPN clients and the destination. The interface (-o enxb827eb7dc89a) has to be adjusted according to the name of the outgoing interface on the VPN server.PreDown: When the VPN server is stopped, the NAT rules will be removed.
Configuration explanation Peer section:
PublicKey: The public key of the clients (generated before)AllowedIPs: This is the most complicated configuration option that confused me a bit in the beginning. This option always includes only IP addresses or networks that are available on the remote site. It’s not an IP address/network outside the tunnel (so no configuration from which public IP address a client is allowed to connect) but only addresses/networks which are transported inside the tunnel! In a road warrior scenario, where the client does not provide a whole network to the server, the netmask is always/32on IPv4 or/128on IPv6. Packets on the VPN server with this destination IP addresses are sent to this specified peer. This peer is also only allowed to send packages from this source IP address to the VPN server. It’s also important to know that there are no peers with the sameAllowedIPsaddresses/networks inside the same configuration file. If this would be the case, the server would not know to which peer the server has to send packages matching multiple peers with the same network configured.
IP Forwarding
IP forwarding has to be enabled on both IPv4 and IPv6. Creating the
configuration file /etc/sysctl.d/wireguard.conf:
# ls -l /etc/sysctl.d/wireguard.conf
-rw------- 1 root root 53 Sep 25 22:23 /etc/sysctl.d/wireguard.conf
# cat /etc/sysctl.d/wireguard.conf
net.ipv4.ip_forward=1
net.ipv6.conf.all.forwarding=1
Loading the configuration:
# sysctl -p /etc/sysctl.d/wireguard.conf
net.ipv4.ip_forward = 1
net.ipv6.conf.all.forwarding = 1
Using nftables (Update from 2021-04-18)
If you want to use nftables instead of iptables on the Wireguard server, you can do this without problems. You have to configure nftables accordingly.
Because several commands are used to configure nftables, it makes sense to use own scripts in the Wireguard server configuration:
PreUp = /etc/wireguard/server-preup
PostDown = /etc/wireguard/server-postdown
Script /etc/wireguard/server-preup:
#!/usr/bin/env bash

VPNIF="wg0"
LANIF="enp2s0"

nft insert rule ip filter FORWARD iifname "$VPNIF" oifname "$LANIF" accept
nft insert rule ip filter FORWARD iifname "$LANIF" oifname "$VPNIF" ct state related,established accept

nft insert rule ip6 filter FORWARD iifname "$VPNIF" oifname "$LANIF" accept
nft insert rule ip6 filter FORWARD iifname "$LANIF" oifname "$VPNIF" ct state related,established accept

nft add table ip wireguard-nat
nft -- add chain ip wireguard-nat prerouting { type nat hook prerouting priority -100 \; }
nft add chain ip wireguard-nat postrouting { type nat hook postrouting priority 100 \; }
nft add rule ip wireguard-nat postrouting oifname "$LANIF" masquerade

nft add table ip6 wireguard-nat
nft -- add chain ip6 wireguard-nat prerouting { type nat hook prerouting priority -100 \; }
nft add chain ip6 wireguard-nat postrouting { type nat hook postrouting priority 100 \; }
nft add rule ip6 wireguard-nat postrouting oifname "$LANIF" masquerade
This script allows forwarding between the Wireguard VPN and the LAN connected interface and adds the NAT rules for IPv4 and IPv6.
Script /etc/wireguard/server-postdown:
#!/usr/bin/env bash

VPNIF="wg0"
LANIF="enp2s0"

nft list chain ip filter FORWARD -a | grep "iifname.*$VPNIF" | awk '{ print $NF }' | while read handle
do
  nft delete rule ip6 filter FORWARD handle "$handle"
done

nft list chain ip6 filter FORWARD -a | grep "iifname.*$VPNIF" | awk '{ print $NF }' | while read handle
do
  nft delete rule ip6 filter FORWARD handle "$handle"
done

nft delete table wireguard-nat
This script removes the added rules. The NAT rules have to be removed via a handler ID because it’s at the moment not possible to remove them via the same syntax as they were added (like in iptables).
Restart your Wireguard server and you are ready to go.
Client Configuration
Routing all Traffic (Default Route)
Configuration file which will route all traffic through the VPN:
# cd /etc/wireguard
# ls -l client-notebook_dgw.conf
-rw------- 1 root root 245 Sep 23 20:34 client-notebook_dgw.conf
# cat client-notebook_dgw.conf
[Interface]
PrivateKey = OPTN5qb4FFulEBFLlrmC1sFTawT6AmdhsAbigpCMemw=
Address = 10.23.5.2/24, fd00:23:5::2/64
DNS = 8.8.8.8

[Peer]
PublicKey = 3oPm1WH3RXv+8zCEQ7onRAYJWAvuHKo/1OfIiTE5LDc=
Endpoint = wg.example.com:1500
AllowedIPs = 0.0.0.0/0, ::/0
Configuration explanation Interface section:
Address: The client gets the IPv4 address10.23.5.2/24and IPv6 addressfd00:23:5::2/64assigned.PrivateKey: This is the private key of the client.DNS: This DNS server is used on the client. This could be a DNS server in the remote network.
Configuration explanation Peer section:
PublicKey: This is the public key of the VPN server.Endpoint: This is the hostname of the VPN server.AllowedIPs: All traffic matching these networks is sent through the VPN tunnel. In this case,0.0.0.0/0and::/0means, that all IPv4 and all IPv6 traffic is routed through the VPN.
Split Tunneling
Configuration file which will route only the traffic for the VPN (
10.23.5.0/24 and fd00:23:5::/64) and for the remote network (
192.168.1.0/24) through the VPN.
# cd /etc/wireguard
# ls -l client-mobile_splittunnel.conf
-rw------- 1 root root 355 Sep 23 20:39 client-mobile_splittunnel.conf
# cat client-mobile_splittunnel.conf
[Interface]
PrivateKey = kKcKPZoC4gULXOmpDi54sAy5tQvnFEn6J8yXC8OxukY=
Address = 10.23.5.3/24, fd00:23:5::3/64
DNS = 8.8.8.8

[Peer]
PublicKey = 3oPm1WH3RXv+8zCEQ7onRAYJWAvuHKo/1OfIiTE5LDc=
Endpoint = wg.example.com:1500
AllowedIPs = 10.23.5.0/24, fd00:23:5::/64, 192.168.1.0/24, 2001:db8:23:5::/64
The only difference is the AllowedIPs directive, which creates a split
tunneling VPN setup. Only the traffic for the provided networks is routed
through the VPN.
Considerations when using NAT or stateful Firewalls (Update from 2018-12-28)
If the server is behind a NAT or a stateful firewall and the client does not
send any traffic to the server for a certain time, the NAT router/firewall will
remove the host state from the connection table. When now a server sends a
packet to the client, the client would not be able to receive this packet
anymore, because the NAT router/firewall does not know what to do with this
packet. To fix this issue, the PersistentKeepalive option can be used to
periodically send an empty authenticated packet to the server to keep the
connection open. WireGuard proposes a value of 25 seconds that would work with
a wide variety of firewalls. (Thanks Ramesh for the
comment on that.)
So, if the server is behind a NAT or stateful firewall, the following option
should be added in the Peer section of the client configuration:
PersistentKeepalive = 25
Server Usage
Start/Stop Manually
Starting the VPN server manually:
# wg-quick up wg0
[#] iptables -t nat -A POSTROUTING -s 10.23.5.0/24 -o enxb827eb7dc89a -j MASQUERADE; ip6tables -t nat -A POSTROUTING -s fd00:23:5::/64 -o enxb827eb7dc89a -j MASQUERADE
[#] ip link add wg0 type wireguard
[#] wg setconf wg0 /dev/fd/63
[#] ip address add 10.23.5.1/24 dev wg0
[#] ip address add fd00:23:5::1/64 dev wg0
[#] ip link set mtu 1420 dev wg0
[#] ip link set wg0 up
[#] ip route add fd00:23:5::/64 dev wg0
Stopping the service again:
# wg-quick down wg0
[#] ip link delete dev wg0
[#] iptables -t nat -D POSTROUTING -s 10.23.5.0/24 -o enxb827eb7dc89a -j MASQUERADE; ip6tables -t nat -D POSTROUTING -s fd00:23:5::/64 -o enxb827eb7dc89a -j MASQUERADE
Start/Stop using systemd
Starting the service:
# systemctl start wg-quick@wg0
Showing details about the service:
# systemctl status wg-quick@wg0
● wg-quick@wg0.service - WireGuard via wg-quick(8) for wg0
Loaded: loaded (/lib/systemd/system/wg-quick@.service; enabled; vendor preset: en
Active: active (exited) since Sun 2018-09-23 20:48:10 CEST; 9s ago
Docs: man:wg-quick(8)
man:wg(8)
https://www.wireguard.com/
https://www.wireguard.com/quickstart/
https://git.zx2c4.com/WireGuard/about/src/tools/man/wg-quick.8
https://git.zx2c4.com/WireGuard/about/src/tools/man/wg.8
Process: 18609 ExecStart=/usr/bin/wg-quick up wg0 (code=exited, status=0/SUCCESS)
Main PID: 18609 (code=exited, status=0/SUCCESS)

Sep 23 20:48:09 wgpi systemd[1]: Starting WireGuard via wg-quick(8) for wg0...
Sep 23 20:48:09 wgpi wg-quick[18609]: [#] iptables -t nat -A POSTROUTING -s 10.23.5.
Sep 23 20:48:10 wgpi wg-quick[18609]: [#] ip link add wg0 type wireguard
Sep 23 20:48:10 wgpi wg-quick[18609]: [#] wg setconf wg0 /dev/fd/63
Sep 23 20:48:10 wgpi wg-quick[18609]: [#] ip address add 10.23.5.1/24 dev wg0
Sep 23 20:48:10 wgpi wg-quick[18609]: [#] ip address add fd00:23:5::1/64 dev wg0
Sep 23 20:48:10 wgpi wg-quick[18609]: [#] ip link set mtu 1420 dev wg0
Sep 23 20:48:10 wgpi wg-quick[18609]: [#] ip link set wg0 up
Sep 23 20:48:10 wgpi wg-quick[18609]: [#] ip route add fd00:23:5::/64 dev wg0
Sep 23 20:48:10 wgpi systemd[1]: Started WireGuard via wg-quick(8) for wg0.
Stopping the service again:
# systemctl stop wg-quick@wg0
The service is now stopped:
# systemctl status wg-quick@wg0
● wg-quick@wg0.service - WireGuard via wg-quick(8) for wg0
Loaded: loaded (/lib/systemd/system/wg-quick@.service; enabled; vendor preset: en
Active: inactive (dead) since Sun 2018-09-23 20:48:25 CEST; 37s ago
Docs: man:wg-quick(8)
man:wg(8)
https://www.wireguard.com/
https://www.wireguard.com/quickstart/
https://git.zx2c4.com/WireGuard/about/src/tools/man/wg-quick.8
https://git.zx2c4.com/WireGuard/about/src/tools/man/wg.8
Process: 18667 ExecStop=/usr/bin/wg-quick down wg0 (code=exited, status=0/SUCCESS)
Process: 18609 ExecStart=/usr/bin/wg-quick up wg0 (code=exited, status=0/SUCCESS)
Main PID: 18609 (code=exited, status=0/SUCCESS)

Sep 23 20:48:10 wgpi wg-quick[18609]: [#] ip address add 10.23.5.1/24 dev wg0
Sep 23 20:48:10 wgpi wg-quick[18609]: [#] ip address add fd00:23:5::1/64 dev wg0
Sep 23 20:48:10 wgpi wg-quick[18609]: [#] ip link set mtu 1420 dev wg0
Sep 23 20:48:10 wgpi wg-quick[18609]: [#] ip link set wg0 up
Sep 23 20:48:10 wgpi wg-quick[18609]: [#] ip route add fd00:23:5::/64 dev wg0
Sep 23 20:48:10 wgpi systemd[1]: Started WireGuard via wg-quick(8) for wg0.
Sep 23 20:48:25 wgpi systemd[1]: Stopping WireGuard via wg-quick(8) for wg0...
Sep 23 20:48:25 wgpi wg-quick[18667]: [#] ip link delete dev wg0
Sep 23 20:48:25 wgpi wg-quick[18667]: [#] iptables -t nat -D POSTROUTING -s 10.23.5.
Sep 23 20:48:25 wgpi systemd[1]: Stopped WireGuard via wg-quick(8) for wg0.
Automatically start the service when the system is started:
# systemctl enable wg-quick@wg0
Disable the service on startup again:
# systemctl disable wg-quick@wg0
Verifying
A new network interface wg0 is created when the service is started:
# ip a l wg0
26: wg0: <POINTOPOINT,NOARP,UP,LOWER_UP> mtu 1420 qdisc noqueue state UNKNOWN group default qlen 1000
link/none
inet 10.23.5.1/24 scope global wg0
valid_lft forever preferred_lft forever
inet6 fd00:23:5::1/64 scope global
valid_lft forever preferred_lft forever
The route is sent according to the AllowedIPs directive:
# ip route
default via 192.168.1.1 dev enxb827eb7dc89a src 192.168.1.10 metric 202
10.23.5.0/24 dev wg0 proto kernel scope link src 10.23.5.1
192.168.1.0/24 dev enxb827eb7dc89a proto kernel scope link src 192.168.1.10 metric 202
Showing the current configuration:
# wg show
interface: wg0
public key: 3oPm1WH3RXv+8zCEQ7onRAYJWAvuHKo/1OfIiTE5LDc=
private key: (hidden)
listening port: 1500

peer: UGyBshzPfAH0U4QAgGJHe07LfUz4RcHA9PhUlUC4cCA=
allowed ips: 10.23.5.2/32, fd00:23:5::2/32
peer: 1xy8XRtUQT/9AwYWlEXsWCezNjfiFjXaBy40UUtAWBo=
allowed ips: 10.23.5.3/32, fd00:23:5::3/32
More data are shown if the clients are connected:
# wg show
interface: wg0
public key: 3oPm1WH3RXv+8zCEQ7onRAYJWAvuHKo/1OfIiTE5LDc=
private key: (hidden)
listening port: 1500

peer: 1xy8XRtUQT/9AwYWlEXsWCezNjfiFjXaBy40UUtAWBo=
endpoint: 178.197.42.137:18822
allowed ips: 10.23.5.3/32, fd00:23:5::3/128
latest handshake: 4 seconds ago
transfer: 788 B received, 732 B sent

peer: UGyBshzPfAH0U4QAgGJHe07LfUz4RcHA9PhUlUC4cCA=
endpoint: 178.197.42.137:18821
allowed ips: 10.23.5.2/32, fd00:23:5::2/128
latest handshake: 16 seconds ago
transfer: 6.61 KiB received, 6.07 KiB sent
Showing the detailed interface configuration:
# wg showconf wg0
[Interface]
ListenPort = 1500
PrivateKey = mNt0Gx2Af/OCkT9FchX3nybsaXUAerglnuMnSud4z1k=

[Peer]
PublicKey = UGyBshzPfAH0U4QAgGJHe07LfUz4RcHA9PhUlUC4cCA=

[Peer]
PublicKey = 1xy8XRtUQT/9AwYWlEXsWCezNjfiFjXaBy40UUtAWBo=
AllowedIPs = 10.23.5.0/24, fd00:23:5::/64
Client Usage
Copying the client configuration file to /etc/wireguard:
# cd /etc/wireguard
# ls -l wg0.conf
-rw------- 1 root root 245 Sep 23 21:17 wg0.conf
# cat wg0.conf
[Interface]
PrivateKey = OPTN5qb4FFulEBFLlrmC1sFTawT6AmdhsAbigpCMemw=
Address = 10.23.5.2/24, fd00:23:5::2/64
DNS = 8.8.8.8

[Peer]
PublicKey = 3oPm1WH3RXv+8zCEQ7onRAYJWAvuHKo/1OfIiTE5LDc=
Endpoint = wg.example.com:1500
AllowedIPs = 0.0.0.0/0, ::/0
Starting the service in the same way as on the server:
# wg-quick up wg0
[#] ip link add wg0 type wireguard
[#] wg setconf wg0 /dev/fd/63
[#] ip address add 10.23.5.2/24 dev wg0
[#] ip address add fd00:23:5::2/64 dev wg0
[#] ip link set mtu 1420 dev wg0
[#] ip link set wg0 up
[#] resolvconf -a tun.wg0 -m 0 -x
[#] wg set wg0 fwmark 51820
[#] ip -6 route add ::/0 dev wg0 table 51820
[#] ip -6 rule add not fwmark 51820 table 51820
[#] ip -6 rule add table main suppress_prefixlength 0
[#] ip -4 route add 0.0.0.0/0 dev wg0 table 51820
[#] ip -4 rule add not fwmark 51820 table 51820
[#] ip -4 rule add table main suppress_prefixlength
A new network interface was created:
# ip a l wg0
4: wg0: <POINTOPOINT,NOARP,UP,LOWER_UP> mtu 1420 qdisc noqueue state UNKNOWN group default qlen 1
link/none
inet 10.23.5.2/24 scope global wg0
valid_lft forever preferred_lft forever
inet6 fd00:23:5::2/64 scope global
valid_lft forever preferred_lft forever
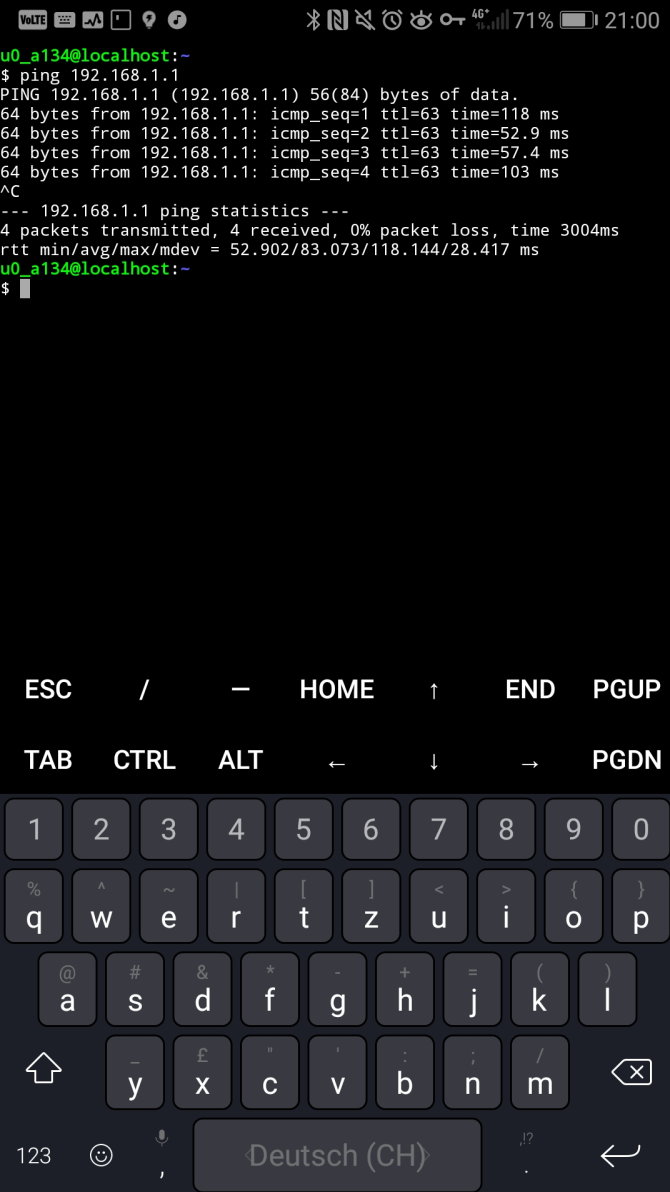
The VPN works:
# ping 10.23.5.1
PING 10.23.5.1 (10.23.5.1) 56(84) bytes of data.
64 bytes from 10.23.5.1: icmp_seq=1 ttl=64 time=284 ms
64 bytes from 10.23.5.1: icmp_seq=2 ttl=64 time=63.3 ms
64 bytes from 10.23.5.1: icmp_seq=3 ttl=64 time=225 ms
64 bytes from 10.23.5.1: icmp_seq=4 ttl=64 time=150 ms
^C
--- 10.23.5.1 ping statistics ---
4 packets transmitted, 4 received, 0% packet loss, time 3004ms
rtt min/avg/max/mdev = 63.345/180.886/284.496/82.871 ms
Showing the connection:
# wg show
interface: wg0
public key: UGyBshzPfAH0U4QAgGJHe07LfUz4RcHA9PhUlUC4cCA=
private key: (hidden)
listening port: 52682
fwmark: 0xca6c

peer: 3oPm1WH3RXv+8zCEQ7onRAYJWAvuHKo/1OfIiTE5LDc=
endpoint: 178.194.23.5:1500
allowed ips: 0.0.0.0/0, ::/0
latest handshake: 5 seconds ago
transfer: 604 B received, 660 B sent
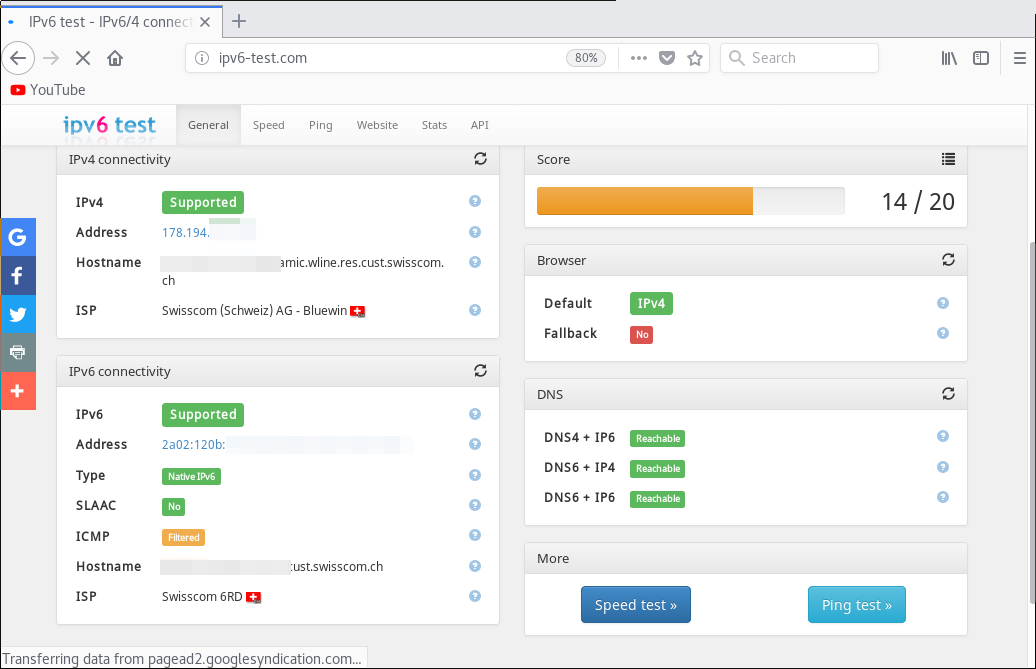
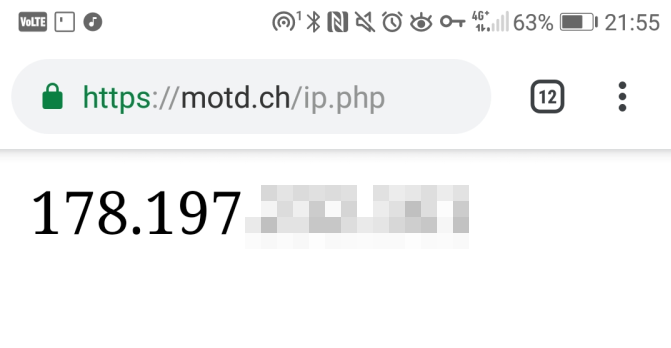
Because the AllowedIPs directive is configured to 0.0.0.0/0 and ::/0, all traffic is routed through the VPN:
# curl -L motd.ch/ip.php
178.194.23.5
Both IPv4 and IPv6 works through the tunnel:
Stoppping the VPN:
# wg-quick down wg0
[#] ip -4 rule delete table 51820
[#] ip -4 rule delete table main suppress_prefixlength 0
[#] ip -6 rule delete table 51820
[#] ip -6 rule delete table main suppress_prefixlength 0
[#] ip link delete dev wg0
[#] resolvconf -d tun.wg0
Starting via a systemd service:
# systemctl start wg-quick@wg0
Stopping via systemd:
# systemctl stop wg-quick@wg0
Status:
# systemctl status wg-quick@wg0
● wg-quick@wg0.service - WireGuard via wg-quick(8) for wg0
Loaded: loaded (/lib/systemd/system/wg-quick@.service; disabled; vendor prese
Active: inactive (dead)
Docs: man:wg-quick(8)
man:wg(8)
https://www.wireguard.com/
https://www.wireguard.com/quickstart/
https://git.zx2c4.com/WireGuard/about/src/tools/man/wg-quick.8
https://git.zx2c4.com/WireGuard/about/src/tools/man/wg.8

Sep 23 21:54:35 dimmbar wg-quick[1629]: [#] ip -4 rule add table main suppress_p
Sep 23 21:54:35 dimmbar systemd[1]: Started WireGuard via wg-quick(8) for wg0.
Sep 23 21:54:46 dimmbar systemd[1]: Stopping WireGuard via wg-quick(8) for wg0..
Sep 23 21:54:47 dimmbar wg-quick[1732]: [#] ip -4 rule delete table 51820
Sep 23 21:54:47 dimmbar wg-quick[1732]: [#] ip -4 rule delete table main suppres
Sep 23 21:54:47 dimmbar wg-quick[1732]: [#] ip -6 rule delete table 51820
Sep 23 21:54:47 dimmbar wg-quick[1732]: [#] ip -6 rule delete table main suppres
Sep 23 21:54:47 dimmbar wg-quick[1732]: [#] ip link delete dev wg0
Sep 23 21:54:47 dimmbar wg-quick[1732]: [#] resolvconf -d tun.wg0
Sep 23 21:54:47 dimmbar systemd[1]: Stopped WireGuard via wg-quick(8) for wg0.
Mobile Client Usage
Generating a QR code for the mobile client:
# qrencode -t ansiutf8 < client-mobile_splittunnel.conf
Adding a new VPN connection by selecting Create from QR code:

Scanning the QR code:

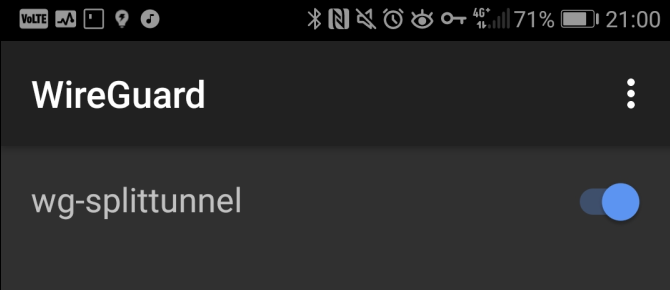
Enabling the VPN:
A new network interface was created with the configured IP addresses:

Accessing the remote network:
It’s also possible to reach other VPN clients (the firewall does not prevent that):
Because split tunneling is used, the normal network traffic does not go through the VPN box:
Debugging (Update from 2019-03-23)
Wireshark
Wireshark has a dissector for WireGuard:
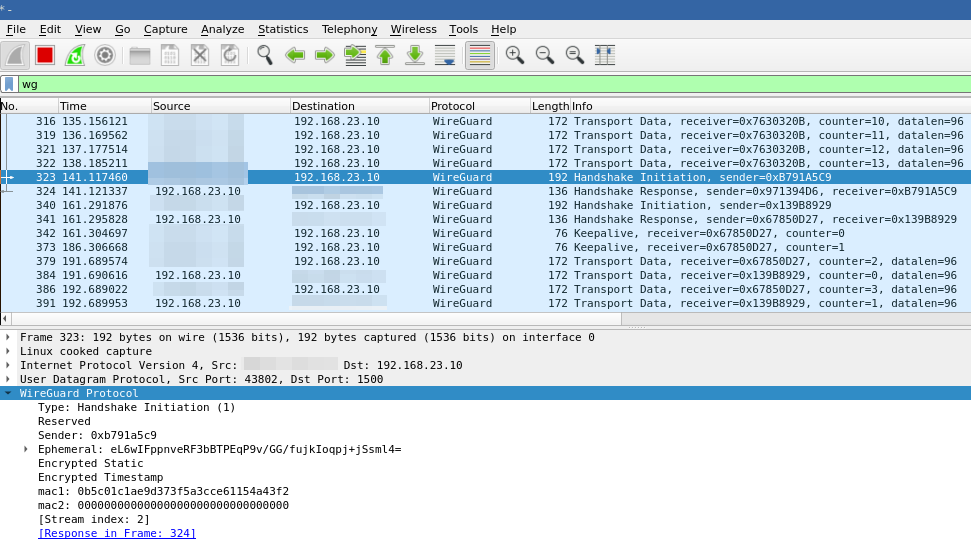
More info on how to decrypt data within Wireshark by providing key logs can be fond here: https://github.com/Lekensteyn/wireguard-dissector.
Blogpost Updates
- 2018-12-28: Add considerations when using NAT or stateful Firewalls (THX to a comment from Ramesh)
- 2019-03-23: Add section about debugging with Wireshark
- 2021-04-18: Add how to configure nftables
- 2025-12-17: Add section about private IPv6 networks
- 2025-12-17: Add PSK for security enhancement
References
- WireGuard Project Page: https://www.wireguard.com/
- Great talk about WireGuard: https://www.youtube.com/watch?v=eYztYCbV_8U&t=2229s
- WireGuard on a Raspberry Pi: https://github.com/adrianmihalko/raspberrypiwireguard
- Source Code (Git Repository): https://git.zx2c4.com/WireGuard/
- Mailing List Archive: https://lists.zx2c4.com/pipermail/wireguard/
- IRC: #wireguard on Freenode